


Finding a cost-effective solution for how to waterproof a deck in order to provide a usable outdoor living space underneath has long been an often expensive problem.
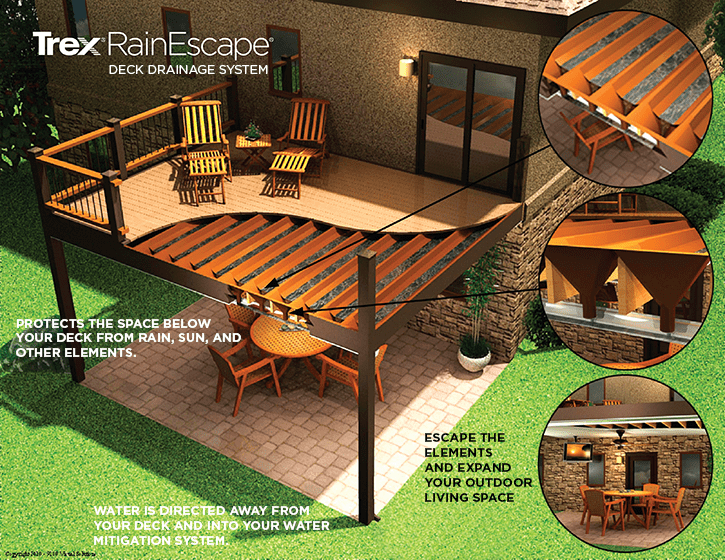
Traditionally – Vinyl Decking has been the solution, but what if you want a more attractive product on your decking surface, like Exotic Hardwood or Composites like Trex? Well – we now have a solution for that, with an innovative product called Trex Rain Escape.
INTRODUCING TREX RAIN ESCAPE
This easy to use system consists of a series of roll-out troughs that create water channels down each joist run to an adjustable downspout which has been designed to work with a variety of joist depths and standard guttering systems. Read more about how Trex Rain Escape was developed here and to see how simple this system is – check out the short installation videos below. We’ve also included a PDF Installation guide below – which is also available for download here.
TOOLS & PREPARATION
Tools: Scissors or utility knife, staple gun, caulk gun (Fig. 1).
Prep: Read all instructions completely before beginning. Place a midspan nailer on the underside of the joist to keep them straight.
MATERIALS ESTIMATORREQUEST A QUOTE
DOWNSPOUT INSTALLATION
STEP 1: Installing the Trex RainEscape Downspout
- Cut downspouts along one 12” or 16” side on the score mark based on joist spacing
- Install all downspouts along rim joists and/or ledger board; cut-out side towards open deck bay
- Downspout should extend 1” into the gutter: cut or extend as necessary.
STEP 2: Installing the Trex RainEscape Trough
- When working with the Trex RainEscape trough material, ensure that the smooth/shiny side always faces up. (Do not seam or overlap the troughs to extend its length)
- Line up the 1 1/2” score with the second joist.
- At the ledger slide 3” of trough under existing siding or flashing ensuring trough sits on top of the ledger board.
- Place the first staple at ledger board on inside joist to tack trough.
- Unroll trough to downspout using 1 1/2” score mark on inside joist as a guide.
- Cut length to back wall of the downspout, cutting a 1” wide by 3/4” tab at centre edge of the trough (fold tab down) to prevent wicking.
- To remove memory from the sheet, backroll the last few inches of the trough.
- Pull the trough tight ensuring memory is released and place a second staple on inside joist through the downspout.
- On outside joist, form a trough into downspout while lining up the edge of the trough with outside of joist. Place a third staple through trough and downspout on outside joist.
- Pull corner at the ledger and outside joist tight keeping entire length of trough smooth and wrinkle-free; place a fourth staple on outside joist at the ledger.
- To test for correct slope, pour a cup of water on trough at ledger board ensuring water runs to the downspout.
- Continue stapling every 6” to 8” from ledger to downspout on both joists to secure.
STEP 3: Tape all Seams
- Trim excess trough at seams, keeping overlap.
- Using Trex Rain Escape Tape, tape ALL seams, joints and perimeter.
NOTE: Trex Rain Escape Caulk can be used instead of tape if preferred. If using caulk, caulk must be applied between ALL product overlaps and between product and decking on the perimeter of the deck.
INSTALLATION VIDEOS
INSTALLATION WITHOUT LEDGER BOARD / FLASHING
INSTALLATION WITH LEDGER BOARD / FLASHING
| DO’s | DONT’s |
| DO make sure your joists are straight and square. Gutters should have outlets every 12’ to 14’. |
DO NOT staple Trex RainEscape products anywhere other than over or into floor joists, ledgers, rim joists, headers, etc. |
| DO make sure when installing the troughs to use one continuous length of the trough material. |
DO NOT use spiked hidden fasteners. Call Trex RainEscape (1-800-BUY-TREX) for directions. |
| DO make sure the trough is wrinkle free and has proper fall to the downspout. Check with local agencies for permits and codes prior to any electrical installation. |
DO NOT stand anywhere other than directly on top of floor joists, ledgers, rim joists or headers as the Trex RainEscape system will not support you. |
installation guide